To be a successful welder, you need to know the ins and outs of your trade. Get tips from this article for achieving optimal results in welding positions.
Choosing the right filler metal and welding process for any project is important to understanding how different positions work.
For example, you may need specific techniques or settings when working with certain types of material in each position instead.
What Is a Welding Position?
Welders use a wide variety of welding positions to join different types and sizes of metals together.
A position is typically determined by the type or size of metal being welded as well as where it will be used on an object; this can include ships, planes (or other vehicles), buildings– pretty much any construction project.
Welding position which is called as the basic is one of the most important positions in welding. The welder should be able to carry out all the different functions of welding position with the help of proper training.
The most common welding positions are: Manual Arc Welding (MIG) Welding Position Flux Cored Arc Welding (FCAW) Welding Position Gas Tungsten Arc Welding (GTAW) Welding Position Gas Metal Arc Welding (GMAW) Welding Position
Types of Welding Positions
The welding position is an important factor when it comes to the flow of molten metal. Different processes require certain angles and positions, so you need a detailed understanding of each one in order to perform them properly.
Knowing the right welding position can make all of your MIG welds more consistent and reliable.
A welding position refers to the angle from which a welder grinds his or her arc. The different positions affect how well-molten filler metal flows and what kind of weld it produces, so understanding them can help you in your career as well.
1- Flat Welding Position (1F or 1G)
The flat welding position uses one’s upper body and hands in order to do this by placing them on either side of an object being welded so that they can move freely back and back-and-forth across its surface while pressing down with their fingertips at points where corresponding pieces meet.”
How to use Flat Welding Position (1F or 1G)
Welders who work in the flat position typically have an easier time welding because they are not fighting gravity.
The fluid stays put, so you can run hotter with higher rates of deposit for this reason – there’s no need to worry about any puddles becoming too loose or waters overflowing from side-to!–and also due to its ease near-horizontal surfaces common among most automotive jobs.
Welding in the flat position is a great way to save time and money on project execution. Of course, the stick process will produce slag, but if you use drag techniques with this type of welder, then there won’t be any problems.
When welding a flat position, it’s important that the work angle changes depending on whether you’re working with 1G or 1F metals. If either wire is off to one side and doesn’t have enough power behind its heat source, then there may not be complete fusion at the spot where they meet in order for them both to go together smoothly without any gaps between all areas welded together properly- leading into stillbirths and crucibles exploding everywhere.
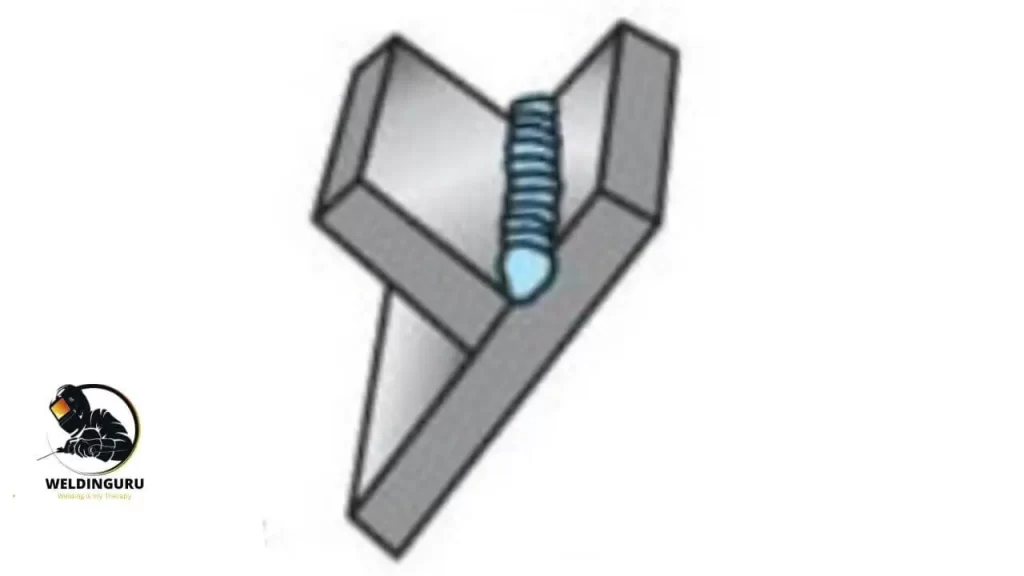
2- Horizontal Welding Position (2F or 2G)
Welding a horizontal joint is one of the most basic and widely used methods for joining metal pieces together.
This technique prevents excessive flow to either side, which would cause weak spots in any weldment you build up with it as well as speed rapid solidification rates since there isn’t competing against gravity here.
How to use Horizontal Welding Position (2F or 2G) ?
Horizontal welds are similar to flat positions, but there are some key differences that make them unique. First of all, you’ll notice how much more stable a horizontal welder is than its vertical counterpart as it can’t fall over.
But even more importantly for most people, this position doesn’t cause any discomfort from extended use in their garage or shop at home, so they find themselves sticking with these types of welding projects instead of going back out into those harsh conditions where another type might be needed.
To ensure a perfect weld, we need to use the right equipment and follow some basic guidelines.
For example, 2G welds require one extra step in comparison with 2F welding because they have bottom shelves that keep their puddles from overflowing or sinking too much; these are known as “fence joints,”.
which can be easily identified by looking at your finished product under magnification (a magnifying glass will help).
To prevent the weld puddle from tilting when you’re working in a horizontal groove, make sure that your work angle is slightly higher on top of where it meets with another piece.
In a horizontal fillet weld, the angle should always stay at 45 degrees.
The reason for this is because keeping it in that range of angles helps to direct all of your heat where you want it- onto just those two pieces meeting together and not anywhere else.
When you want to avoid problems with your weld, don’t run it too hot! Puddles can get fluid and lose their shape quickly if they are at risk of being gravity-sucked into puddled areas.
Also, make sure that the temperature or glossy finish on top doesn’t change significantly for any reason before going ahead with this step in particular so as not to have issues later down the line.
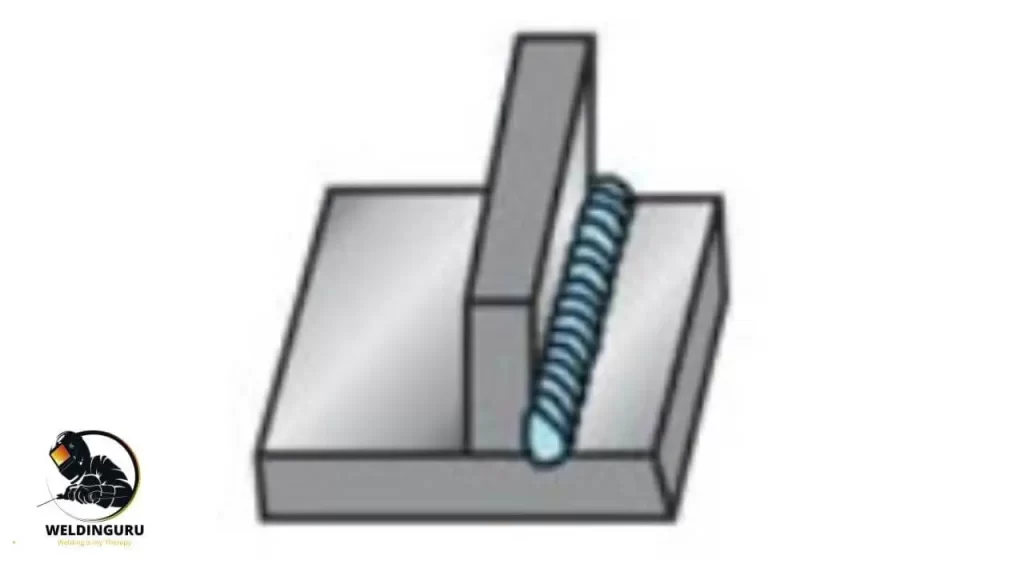
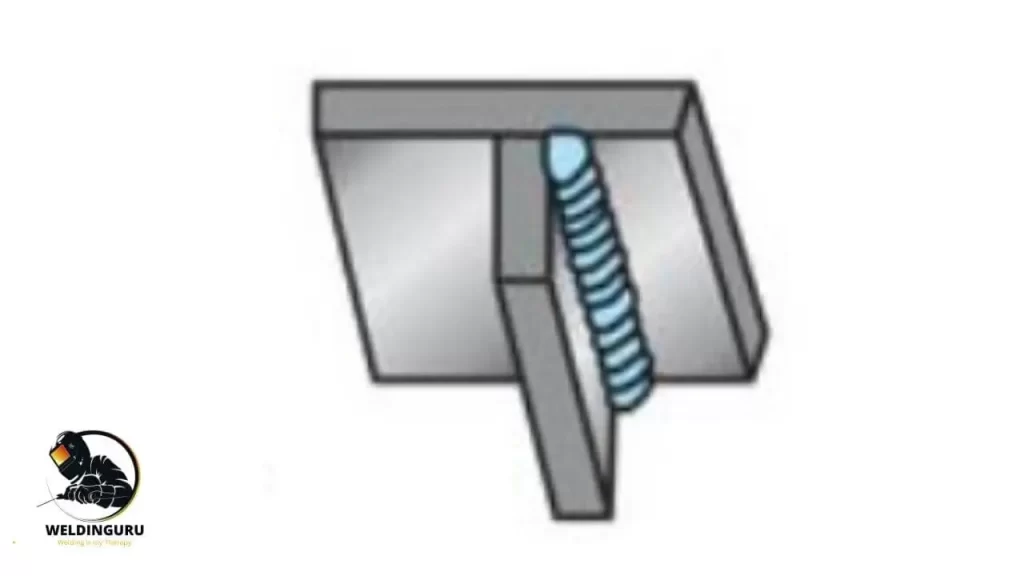
3- Vertical Welding Position (3F or 3G)
Vertically positioned welds have their molten metal running downward and piling up.
Therefore, the rod should be held slightly above the centerline of a joint, while flames sweep across it to even out any areas that may contain more material than others; this prevents unwanted pooling or runs in different depths along vertical surfaces like pipes, for instance.
How to use Vertical Welding Position (3F or 3G)
A vertical weld is a type of joint where the top and bottom pieces meet.
They can be formed in either an up-and-down orientation, usually when welding thicker materials that would otherwise not fit on a flat surface or horizontal workbench, or they could just hang there while you do all your other tasks.
It is important to use different parameters and techniques when welding a vertical weld.
The puddle will naturally want to sag out of the joint if you try using the same settings as for flat or horizontal work on an inclined surface, so it’s best not to get frustrated.
Reducing wire feed speed and voltage will help to prevent fluid from flowing out of welds.
Failing this, adjust the parameters until you achieve good results in vertical welding processes such as stick or butt joints where there is no horizontal component being added onto an existing surface; produce high-quality aluminum extrusions by using our blowtorch machine today.
Auto-Set™ technology helps you weld thicker material with lower input heat.
This is because the settings are specifically designed for thinner base metals, and it will allow your welder to remain more consistent even when welding on larger scale projects or in different fabrication processes such as plastic molding where there isn’t enough room for thin metal plates beneath them.
For a 3G weld, a 90-degree angle is recommended. However, for the less common third type of MIG welding called “3F” this may not be enough
You will need to use 45 degrees instead with its lower output power rating, which has been shown as being much more effective in certain cases when working on thin materials like stainless steel or aluminum alloys without any appreciable thickness change happening below 1/4 inch during hot cutting operations.
Move the puddle in a way that washes it to each edge of your joint. When you go straight up with vertical welds, they typically result in ropey beads which don’t wash into the edges well- instead hold onto those toes for longer and quickly move across while traveling upward.”
The puddles can be manipulated with many different techniques; some operators prefer the zigzag motion, while others use an upside-down T or stacked triangles.
When you vertical weld, the position of your welding torch and technique are most important, you want to make sure that before starting any project for real, though – practice will get those parameters perfect, so they produce what we need.
4- Overhead Welding Position (4F or 4G)
The overhead welding position (4F or 4G) is a popular choice for Side Only Welding because it tends to produce high crowns on beads.
This method also allows you more control over your weld bead by depositing less metal below than when using other positions, which can lead to too much excess material above.
How to use Overhead Welding Position (4F or 4G)
In this welding position, It is important to find the most comfortable position when lying down for overhead welding because you will be spending time in this position.
Try different angles and locations before deciding on one that suits your needs best so as not to have any pain or discomfort while working with equipment around metal pieces that cannot move out from under them during production times.
With overhead welding, you have to be a little more careful about your weld parameters.
You will need lower heat and slower speeds for this type of work since there is no Vertical cousin who can help hold things up while we do our job.
But don’t let that stop us from getting those tackles in tight spaces or making anything happen on demand – 4G Weights allow just enough creativity, so all systems go at any given moment.
Welding in the overhead position can be tricky, especially if you are using an open flame. The sparks will drop down and may hit your head, so it’s important to wear some type of protection like a welding helmet with a full face shield or glasses.
Also, be aware that when working stick-welding style, there is more potential for injury because these types of welds produce much higher levels of fire than other processes like MIG/MAGnetics, etc.
which could burn right through clothing without sticking onto the skin too badly at first glance but then turn into quite painful burns once oxygen gets access.
Also See: Is It Legal To Weld A Truck Frame?
Positions for Pipe Welding
Welding pipe can be a complicated process, but it is important for the user to understand their welding position and how it applies in any given situation.
The most common type of weld positions are fixed-position or rolling ones based on what you’re doing with your welder at that moment; however, every job has its own unique set up so make sure you read through them carefully before starting work.
Horizontal Pipe Rolled Weld
Once you have the joint in place, line up and tack welds to hold it steady. You can also use steel bridge clamps for extra security while working on your project; just ensure that they are mounted before sticking pieced into them so as not to damage any parts.
When you complete this process for the first time, your weld will be crooked.
To fix it and make sure that aligned pipes are sturdy enough to hold their own weight in any direction without twisting or spinning too much on one side while being supported only at either end by metal supports running orthogonal (perpendicular) across each others’ diameter’s length—we use what’s called “tripods.”
Make sure you hold the torch between these points to make it work properly. The pipe should be the only thing that’s rotated, not yourself or anything else in front of your body.
The torch position needs to be adjusted when welding at an angle. The rod and flame will change as you move northeast, which makes this a little bit harder than vertical welding for beginners but still possible with practice.
We recommend stopping just before you come back to the starting point so that everything has time to heat up and bond together more evenly. This will help ensure a seamless attachment.
Horizontal Pipe Fixed Position Weld
A horizontal pipe fixed position welding machine can be used to weld pipes in a straight line.
The process is similar but not quite as efficient or precise due to the lack of rotation that this type provides for pieces being joined together on an inclined surface.
When you are finished welding, make sure to orient the pipes correctly. There should be four in total; one at each of their corresponding points (the north-east point is NE), southeast side(SE), and west. (WF).
Be careful not to move these once begun because they’re stuck that way.
Practically this process of welding can be broken down into 4 easy steps.
The first step of this procedure is to weld an upwards direction from the south point and then continue with your work backtracking until you reach both ends at their respective boom heights.
Next, we will need one more course: Bring out some liquid nails or another type appropriate for joining metal successfully.
After you’re finished welding the points together, go back and forth between the east point and north. Finally, return to the west for overlapping of beads, so all parts fit perfectly together.
Welding is a very popular trade these days, but some people might be intimidated by the prospect of getting started.
If you’re one such individual and want to avoid learning how or why we do things differently from most other trades out there today, then feel free.
We won’t judge; after all, this isn’t an either/or situation -you can jump right into welding whichever way suits you.
Vertical Pipe Fixed Position Weld
When you are welding pipes in a vertical position, it is best to use the backhand technique.
You will start at your tack point and go around each side of them while maintaining contact with both pieces throughout this process, so they don’t slip out from under me.
Also See: How to Weld Brass to Brass?
Why do you need Different Welding Positions?
Different welding positions are required because it allows you to weld in different styles.
While the terms aren’t used in the same way, welding positions are defined by their reference to gravity, while welding styles are ways of controlling heat input and travel speed.
Knowing how to use each one – which is more advantageous to your application – will increase efficiency and quality in your welding work.
Welding positions may also be defined by their reference to the weld pool.
For example, the front position refers to starting at point A and moving toward point B, while the top position is starting at point A and moving away from it.
The two are often used interchangeably depending on what’s more convenient or efficient for the welder.
The welder stands with its back to the weld pool and starts welding by moving away from the bottom of the workpiece toward the top of it (point A).
This position is preferred when welding parts that need to be flat. That’s because gravity will help create convergence as you work; it will pull the weld pool towards you and away from the feed rod.
Other times it’s easier to get a specific view of your work in the bottom position, which is why some people choose it when working inside a small space.
It’s also great for welding in awkward positions because you can control how much heat input is going into your workpiece.
Welders should be careful when using this position, however, because the weld pool is susceptible to slag inclusion.
In other words, dirt and particles can easily contaminate your weld if they’re not removed properly.
How to Better Understand Welding Positions
The position of your hands is important when welding.
Therefore, you should always do a few practices passes prior to performing the weld if you are not comfortable so that any inconsistencies in positioning along its length won’t be seen as they can result from an uncomfortable resting or standing spot.
Make sure you pick the right metal for your welding position.
If it isn’t overhead or out-of-position, choose a filler material with the capability of doing both so that special attention can go into optimizing welds in those situations without having to rework them later on down (and risk damaging) during production.”
Multipass Arc Welding
Multipass welding is a very popular and useful technique to weld thick materials. Multipass welding is also known as “cracking the weld”. Imagine we want to join two metal sheets (say A & B) and the total thickness is more than 1mm.
To weld these two sheets together, the first pass is made at 45 degrees, and then the current (electrode) is withdrawn manually, i.e. electrode does not follow the movement of the arm.
After making this first pass, we rotate the metal sheets and make a second pass of welding, and then again we make a third pass, and so on.
After making a few passes, the metal weld will be thick and strong enough to be used in a structure or mechanical work.
Root Beads
When using a lineup clamp, you should start at the bottom of your groove and build up some sort-of seal on top.
If no backing ring is present in this situation, then it’s important to add one before proceeding so as not to have any leaks later down the line when pressure builds up during use.
A backing ring should be used when fusing the root bead to prevent it from falling off.
The amount of loose roots that can potentially fall after being attached with clamps is limited, so don’t waste any space by applying less than what will fit into your bars; use as much for every bar you plan on using and make sure there’s enough left over, so next time we do this project together if need be-I’ll just put some more down.
Filler Beads
Fusing the filler beads (see diagram view B above) will ensure a strong bond with your root-stem hybrid.
A single or multiple fusibles may be needed to do so, depending on how deep you want them fused into place and what type of material they are being used for – such as clay pipes, in which case one could use something like silicone gel that has been mixed into some polymer compound.
But if someone wants only stubs sticking out without any additional hanging around then just muscle alone should suffice.
Finish Beads
The finish beads are put over the filler beads to give it that final touch.
You may have guessed by now, right? These small pieces can be anywhere from ⅝ inch wide all the way down into 1/16th of an inch or more depending on what you want your finished product looking like.
Aluminum Pipe Welding
When it comes to aluminum pipes, the design is different than steel.
Instead of using a backing ring and fit between two pieces with friction fits for connection at joints where there’s an incision made in one length or another way; these types don’t need any extra support because they’re weaker materials.
so anything placed against them won’t bear much weight – this includes our hands when working directly beside each other without protection though.
Backing rings are used to provide stability and durability.
A sturdy backing ring can be placed on the end of any piping system, providing extra reinforcement for a more secure installation.
while also ensuring that it will not wear over time like other items might do due in part to their materials being constantly moved around during use.
The Classification for Pipe Welding Positions: 1G 2G 5G 6G
Welding is a very important process in the world of oil and gas projects.
The quality assurance organizations, such as ASME AWS ISO JWES, make rules for classifying different welding positions so that professionals can maintain their standard throughout all industries with similar needs.
These groups provide clear guidelines on how to perform each type which includes requirements like voltage or pressure level needed at any given time while also describing what tools will best suit your job site’s conditions when working away from ground sources.
In order to ensure safety, all welders involved in construction need certifications.
The pipe welding position is divided into two types: groove joint and fillet joints; this means most connections on pipes use those terms, so they often hear of it as a pipe welder’s role.
The four groups of pipe welding positions are 1G, 2G, 5G, and 6G. These classifications depend on the amount of pressure that needs to be applied when joining two pieces together with different material types.
- 1G Pipe Welding Position
The 1G welding position allows for the pipe to be welded in horizontal and vertical positions.
This means that the welder has a lot more options when it comes time to make their fix, as they can choose between making an upside-down “V” or right side up “W.”
- 2G Pipe Welding Position
This welding position is one that can be done quickly. The 2G welders are responsible for fast, horizontal welding on pipes with vertical rods and vice versa.
In addition, they use their experience to keep an even temperature across the joint, so there aren’t any unattractive cracks or bubbles in your finished product.
- 5G Pipe Welding Position
5G welding position is a situation where the welder moves around in X-axis while performing welds. In this case, it’s almost the same as 1 G, except that pipe cannot be rotated at all.
- 6G Pipe Welding Position
In the most difficult welding position, pipes can be welded with a 6G welder if you find yourself in this situation and need help getting straightened out quickly or want to avoid any future difficulties.
A pipe is a straight piece of equipment that has two axes: an X-axis and a Y-axis.
The first one determines its position at 45 degrees to either side (X+/-45), while the other angles are 60° down or up from this horizontal line – so if you’re looking at +90 on your monitor, then it would be written as 90 °.
Pipe welding is a tricky and challenging task that requires skill. The welder must know how to properly position themselves in order for the torch to function properly, which will affect the quality of weld results as well as their own safety while doing so.
For example: if you have a 1G qualification but want an easier 6G job-you’re outta luck because those positions require different skills than what’s required by most people who take up this career path.
Welding Symbols: Different Positions Explained
Looking at the symbols on a blueprint can be very confusing for beginners. The order of these lines says what type or welding position they represent, but it’s hard to know which one you need when starting out.
Safety Precautions During Welding
- Always wear a helmet and a welding jacket in order to protect yourself from sparks.
- Avoid direct eye contact with the welding arcs, as it can lead to retina damage.
- Although each work environment is different, always wear gloves when handling hot metals after they have been welded. This is because the heat from the weld can damage the skin and cause second-degree burns.
- When welding, it is important to be aware of any pipelines that may be running under the work area. The build-up of heat from welding can cause a leak or even an explosion if something like this is present.
- Make sure there are blankets available to put over the pieces being welded if there is a danger of the weld pool freezing. Freezing can cause the metal to crack.
- Be aware of your surroundings and who or what is around you. Sparks can easily start fires, so it is important to keep a fire extinguisher nearby in case of an emergency.
- Welding is a common task in most metalwork environments. Welding can be used to join pieces of metal together or to separate pieces that are stuck together. When welding, it is very important for the worker to take precautions in order to ensure safety during the entire process.
- Safety precautions when welding includes wearing a helmet and welding jacket, avoiding direct eye contact with the welding arcs, and wearing gloves when handling hot metals. It is also important to be aware of your surroundings and to keep a fire extinguisher nearby in case of an emergency.
- Sparks can easily start fires, so it is important to take the necessary safety precautions when welding. By following these simple guidelines, workers can ensure their safety and avoid any potential accidents while welding.
Also See: Can Welding Make You Blind?
Conclusion
If you’re a beginner, welding positions are one of the big things that you’ll need to be familiar with.
This is because these positions are what your body will have to be in for you to be able to complete your welding projects.
So if you plan on doing any welding projects or attending a welding certification class of some sort, then knowing this information can surely come in handy.
FAQs
What is A and Z in welding?
The A and Z symbols in ISO 2553 and EN 22553 are used to measure the penetration of welds and butt joints. a = design throat thickness. b = leg length. z = leg length. For butt joints, an S with a number to the left of a symbol refers to the depth of penetration.
What is CC and CV in welding?
From a design and arc control standpoint, there are two fundamentally different types of welding power sources. These include power sources that produce a constant current (CC) output and power sources that produce a constant voltage (CV) output. The advantage of CC is its ability to control the arc which results in more precise welds. CV provides a more stable arc which can result in better consistency between welds.
What does 6013 mean in welding?
E6013 is a mild steel electrode with light penetration that means it can be used in all positions but not on the vertical down. Furthermore, while it is a rutile potassium based flux coated electrode and has a tensile strength of 62,000 psi, which means it will have strong links and connections with most metals.
Recommended Post: